How to Use Chroma Key in KineMaster for Green Screen Videos
If you create reels, ads, YouTube shorts, client promos, or social media creatives, you’ve definitely seen those videos where the background magically changes — a person standing in an office suddenly appears in Dubai, a teacher stands inside a presentation slide, or a product floats in space.
That effect is called Chroma Key (Green Screen) — and the best part?
You don’t need a PC or After Effects anymore.
With just your phone and KineMaster, you can produce professional-level content for clients and even build a media business around it.
This guide will walk you through the complete beginner-to-pro workflow — not just buttons — but how designers actually use it in real projects.
What is Chroma Key (Green Screen) — In Simple Words
Chroma key removes a specific color (usually green) from your video and replaces it with any background.
So you record:
Person + Green Background
And KineMaster converts it to:
Person + Any Background (office, cafe, website UI, motion graphic, city, etc.)
Why green?
Because human skin tones rarely contain pure green, so the software can easily separate subject from background.
Why Designers & Social Media Agencies Use It
If you run a digital service or create content for clients, chroma key instantly increases perceived value.
You can create:
• Talking head explainer ads
• Course promo videos
• Instagram reel content
• Real estate walkthroughs
• Product launch creatives
• Educational tutorials
• Personal brand authority videos
One creator with a green cloth can produce content for 10 different businesses — that’s why agencies love it.
Step 1 — Record the Green Screen Video Properly (Most Important Step)
90% of beginners fail here.
KineMaster is powerful — but it cannot fix bad shooting.
Basic Setup
You don’t need a studio. You need 3 things:
1. Flat Green Background
Green cloth, wall, or chart paper
No folds or wrinkles
No shadows
2. Proper Lighting
Light the background separately
Avoid harsh light on face
Stand 3–5 feet away from green screen
3. Camera Settings
Record in 1080p
Avoid motion blur
Don’t wear green clothes
? Tip: Even a ₹300 green bedsheet works better than a messy expensive setup.
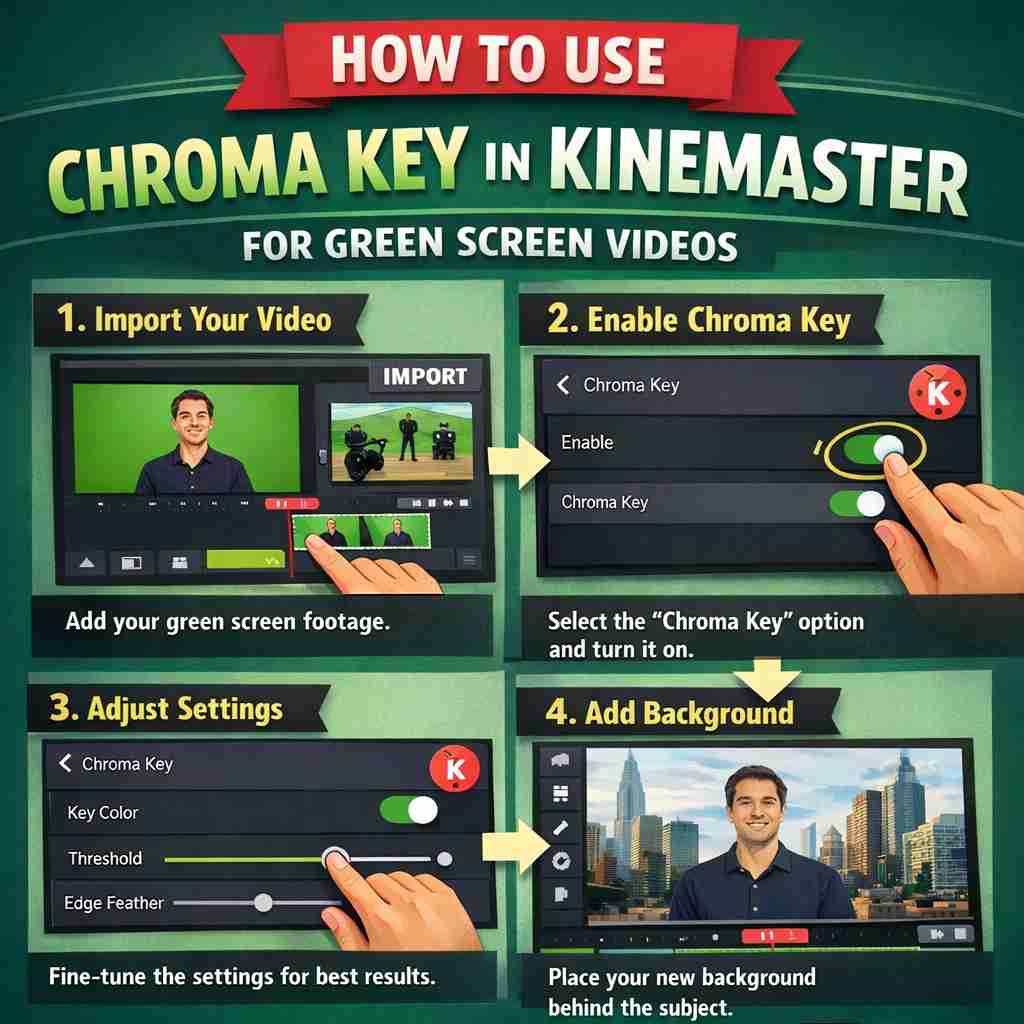
Step 2 — Import Clips in KineMaster
Open KineMaster → New Project
Choose aspect ratio (9:16 for reels, 16:9 for YouTube)
Import background video or image first
Tap Layer → Media
Import your green screen video
Now your green video will appear on top of background.
Step 3 — Enable Chroma Key in KineMaster
Tap the green screen clip → Scroll right → Select Chroma Key
Turn ON → Boom… background disappears.
But wait — it won’t look perfect yet.
This is where professionals separate themselves from beginners.
Step 4 — Adjust the Chroma Key Settings (Real Secret)
You’ll see two main sliders:
1. Key Color Adjustment
Pick the exact green color from your background using the picker.
2. Detail & Edge Refinement
This is the most important step.
Adjust slowly:
• Increase detail → removes green patches
• Reduce softness → sharp edges
• Balance transparency → natural look
Goal:
No green edges + no missing body parts.
Take 2 minutes here — it upgrades quality massively.
Step 5 — Match Lighting & Color (Make It Look Real)
Now your subject is cut out — but still looks pasted.
To make it cinematic:
Tap clip → Color Adjustment
Match:
Brightness
Contrast
Temperature
Tint
Example:
Indoor office background → warm tone
Outdoor background → cool tone
When colors match, brain believes it’s real.
Step 6 — Add Shadows (Professional Trick)
Real humans cast shadows.
Add a fake shadow:
Duplicate subject layer
Darken brightness
Blur slightly
Move behind feet
Instant realism boost.
Step 7 — Add Motion Graphics & Text
Now you have a powerful composition.
Designers use this moment to add:
• Titles
• Icons
• Website UI demos
• Product highlights
• Social proof elements
For example — when showing website demo screens, you often download assets in heavy formats and convert them quickly (like a quick BMP to PNG before importing into the project so KineMaster handles them smoothly without lag.
Small workflow optimizations like this save hours when working with multiple client projects.
Step 8 — Export Settings for Social Media
Don’t just export randomly — platforms compress aggressively.
For Instagram Reels
1080 × 1920
30 FPS
8–12 Mbps
For YouTube
1920 × 1080
30 FPS
12–20 Mbps
For Ads (Meta / Google)
1080 × 1080 OR 4:5
10–15 Mbps
Common Mistakes Beginners Make
Avoid these and your videos will instantly look premium.
❌ Standing too close to green screen
❌ Uneven lighting
❌ Over-sharp edges
❌ Mismatched background perspective
❌ No color grading
❌ Ignoring shadows
Remember — editing fixes only 30%. Shooting fixes 70%.
Real Business Use Case (How Creators Earn From This Skill)
Many freelancers don’t sell editing — they sell video solutions.
Example packages agencies sell:
₹2,000 – Talking Head Reel Pack (5 videos)
₹5,000 – Course Instructor Videos (10 videos)
₹12,000 – Personal Brand Monthly Content
₹25,000 – Ad Creative Package
Clients love it because:
They don’t need a studio, office, or location.
You just place them anywhere digitally.
Pro Tips Used by Media Agencies
• Record once → create 10 backgrounds
• Use branded colors in background
• Add moving graphics behind speaker
• Combine with subtitles for engagement
• Use fake depth blur to simulate camera lens
The moment you master this, you stop being an editor — you become a content producer.
Final Thoughts
Chroma key in KineMaster is not just an editing feature — it’s a business skill.
With one phone and a green cloth you can:
Create ads
Teach courses
Build personal brands
Run agency services
Sell monthly content packages
The creators earning the most today aren’t the best shooters — they are the best problem solvers.
And green screen solves one of the biggest problems:
Creating professional videos anywhere, anytime, without expensive setups.
Master it once — and you’ll never run out of content ideas or client opportunities again.


